CommerceTools Plugin Integration
Integration guide for Forter's official CommerceTools Plugin

CommerceTools Plugin Integration Guide
Forter's CommerceTools plugin allows merchant's to connect their CommerceTools store to Forter's real-time trust engine to receive real-time decisions at checkout.
Step 1: Download and Install the CommerceTools Plugin in your store
Forter portal Account and Credentials**Note: **You will need an existing Forter portal account with dedicated Forter credentials in order to complete the CommerceTools plugin installation.
- Select your Portal environment: Log into your Forter portal and make sure you're toggled to the environment that corresponds to the CommerceTools store you're installing (sandbox store should point to your Forter Sandbox, etc). You will need a dedicated Forter siteId and secret key in order to complete the installation.
- Download and Host the Plugin: You can find Forter's official CommerceTools plugin via our official open source Github repository.
- **Initiate the script in your terminal:**Upon installation, you'll activate a script in your local environment or existing store server to add your Forter credentials, enable the relevant scopes, and set permissions.
Step 2: Select your API scopes in CommerceTools and setup API client
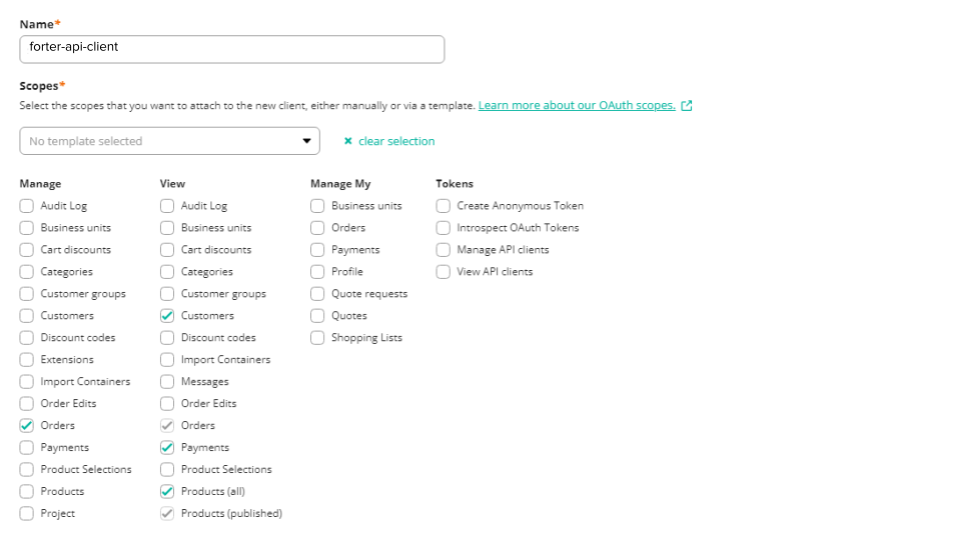
You'll need to expose the following scopes for the API client that you've configured in your setup script:
view_customersmanage_ordersview_paymentsview_products

Step 3: Set up your AWS SQS queue
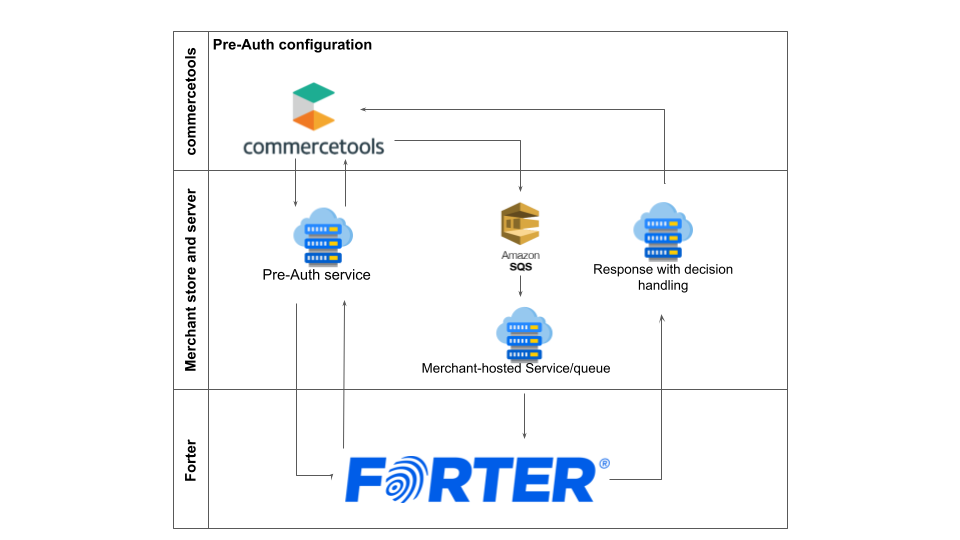
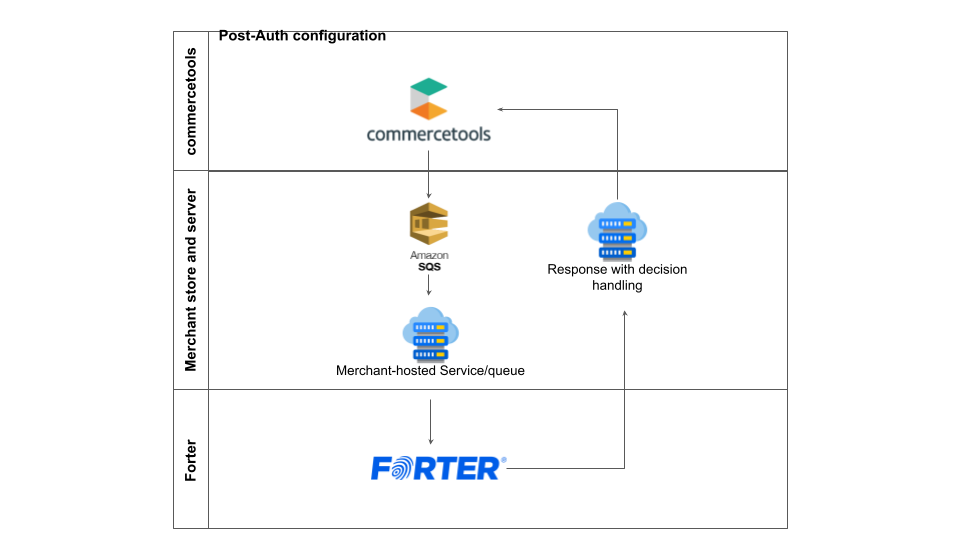
You'll need to set up a dedicated AWS SQS queue to receive and process the authorization response that is mapped from your payment gateway to the appropriate Forter API (order status in the case of pre-auth configurations and order validation in the case of a post-auth configuration)


post-auth configuration
Step 4: Finalize your Frontend integration
Forter's commerceTools plugin can support:
- Headless storefronts - where our standard JS integration should be used.
- CommerceTools Composable Commerce frontend - where Forter's JS script integration is also compatible with the official CommerceTools composable commerce frontend (fontastic).
Based on your storefront setup, you'll align with your Forter team to confirm the script is enabled and functioning as expected.
Once the script is enabled, you'll need to add logic to your CommerceTools store to map the forterToken value to the custom_fields object in your CommerceTools API.
Step 5: Retrieve Payment Data and pass it to your platform
Review your payment gateway admin and available raw data. Depending on your gateway and the payment methods you accept, you'll need to retrieve certain payment details for each transaction and make sure they're mapped to the custom_fields object in the payment data of the CommerceTools transaction request. This should include details for credit cards like:
- Name On Card
- Card Bin/token
- Last four digits
- Card expiration
- Authorization Code (for post-auth)
- Gateway Id (for post-auth)
- cvv Result Code (post-auth)
- avs Result code (post-auth)
Step 6: Map the custom_fields data to the plugin
Once you've passed this data into the dedicated custom_fields object, you'll need to map the payment data and additional custom fields (like the tokenCookie) to the request mapper in the plugin.
Custom mappings should include the connectionInformation object and the payment array and relevant payment method objects (creditCard, applePay, etc) of the Validation API request body and in the case of Pre-Auth configurations, the verificationResults object will need to be mapped with the payment authorization response data from your payment gateway in the Order Status API request body
Step 7: Customize your decision handling
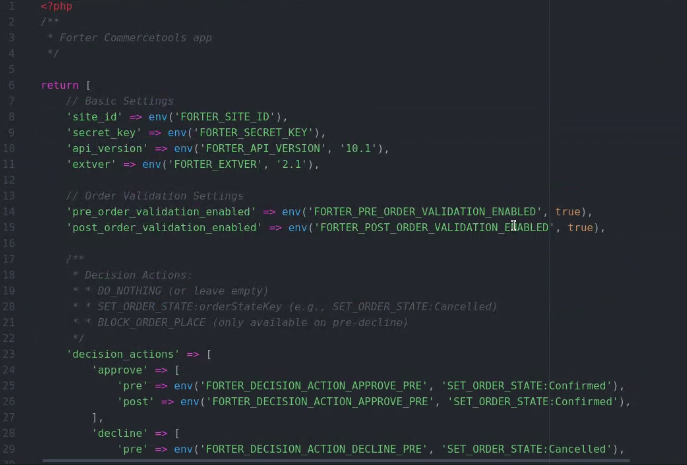
The Forter CommerceTools plugin has a selection of available updates that can be made to the OrderState based on the Forter decision.
| Decision | Action Option 1 | Action Option 2 | Action Option 3 |
|---|---|---|---|
| Approve | "confirm" status | No Action (status does not change) | |
| Not Reviewed | "confirm" status | No action (status does not change) | |
| Decline | "cancel" status | block the order (order level not payment level) | No Action (status does not change |
You can also add custom logic for any decision and decision handling as well as logic to handle additional API response parameters like the recommendations or reasonCode in the API response to trigger custom flows or appropriate payment actions like 3DSecure friction or a PSD2 exemption.

Step 8: Test your Flows
Once you've customized your decision handling and the payment data retrieval and mapping to the relevant Forter APIs used in the plugin, you should thoroughly test all flows and payment methods. This should include flows like:
- POS orders :department-store:
- Mobile App orders 📱
- Redirect orders :arrow-right-hook:
- Subscription orders 🔁
- Orders that receive a payments recommendation that should be passed to your payment gateway to trigger 3DS or PSD2 exemptions 🏦
and payment methods like:
- Installment Services (Klarna) 📆
- Wallets (applePay, GooglePay, etc) 👛
- Credit Cards :credit-card:
- PayPal 🅿️
Step 9: Go Live 🎆
Once you've tested your flows and customizations in sandbox, you can deploy the plugin to your production environment using your dedicated Forter Production credentials. You will also need to add your Forter Production JS snippet if you have a headless CommerceTools storefront site. Determine a date and time for Forter to enable decisions in Production.
Step 3: Set up your AWS SQS queue
You'll need to set up a dedicated AWS SQS queue to receive and process the authorization response that is mapped from your payment gateway to the appropriate Forter API (order status in the case of pre-auth configurations and order validation in the case of a post-auth configuration)


post-auth configuration
Step 4: Finalize your Frontend integration
Forter's commerceTools plugin can support:
- Headless storefronts - where our standard JS integration should be used.
- CommerceTools Composable Commerce frontend - where Forter's JS script integration is also compatible with the official CommerceTools composable commerce frontend (fontastic).
Based on your storefront setup, you'll align with your Forter team to confirm the script is enabled and functioning as expected.
Once the script is enabled, you'll need to add logic to your CommerceTools store to map the forterToken value to the custom_fields object in your CommerceTools API.
Step 5: Retrieve Payment Data and pass it to your platform
Review your payment gateway admin and available raw data. Depending on your gateway and the payment methods you accept, you'll need to retrieve certain payment details for each transaction and make sure they're mapped to the custom_fields object in the payment data of the CommerceTools transaction request. This should include details for credit cards like:
- Name On Card
- Card Bin/token
- Last four digits
- Card expiration
- Authorization Code (for post-auth)
- Gateway Id (for post-auth)
- cvv Result Code (post-auth)
- avs Result code (post-auth)
Step 6: Map the custom_fields data to the plugin
Once you've passed this data into the dedicated custom_fields object, you'll need to map the payment data and additional custom fields (like the tokenCookie) to the request mapper in the plugin.
Custom mappings should include the connectionInformation object and the payment array and relevant payment method objects (creditCard, applePay, etc) of the Validation API request body and in the case of Pre-Auth configurations, the verificationResults object will need to be mapped with the payment authorization response data from your payment gateway in the Order Status API request body
Step 7: Customize your decision handling
The Forter CommerceTools plugin has a selection of available updates that can be made to the OrderState based on the Forter decision.
| Decision | Action Option 1 | Action Option 2 | Action Option 3 |
|---|---|---|---|
| Approve | "confirm" status | No Action (status does not change) | |
| Not Reviewed | "confirm" status | No action (status does not change) | |
| Decline | "cancel" status | block the order (order level not payment level) | No Action (status does not change |
You can also add custom logic for any decision and decision handling as well as logic to handle additional API response parameters like the recommendations or reasonCode in the API response to trigger custom flows or appropriate payment actions like 3DSecure friction or a PSD2 exemption.

Step 8: Test your Flows
Once you've customized your decision handling and the payment data retrieval and mapping to the relevant Forter APIs used in the plugin, you should thoroughly test all flows and payment methods. This should include flows like:
- POS orders :department-store:
- Mobile App orders 📱
- Redirect orders :arrow-right-hook:
- Subscription orders 🔁
- Orders that receive a payments recommendation that should be passed to your payment gateway to trigger 3DS or PSD2 exemptions 🏦
and payment methods like:
- Installment Services (Klarna) 📆
- Wallets (applePay, GooglePay, etc) 👛
- Credit Cards :credit-card:
- PayPal 🅿️
Step 9: Go Live 🎆
Once you've tested your flows and customizations in sandbox, you can deploy the plugin to your production environment using your dedicated Forter Production credentials. You will also need to add your Forter Production JS snippet if you have a headless CommerceTools storefront site. Determine a date and time for Forter to enable decisions in Production.
Updated 4 months ago
